
How-to Build a Back Map
What is a Back Map?
A back map is a useful tool for selecting the proper tree for difficult to fit horses and can be used by anyone to determine if their saddle fits the horse. Using a back map can also help you determine where shims and padding can help improve how well your saddle fits.
Our version of the back map is inexpensive, and allows for you to visually evaluate how well your saddle or a saddle you are considering buying, fits your horses. We feel that our system of molded wires is superior to opaque full-sized molds such as the Steele Saddle Tree Fit-To-Be-Seen ® or the EQUImeasure ® for most horse owners because it is much less expensive, reusable, easily transported, and most importantly allows you to see how the tree will fit your horse.
The Crest Ridge Saddlery “How to Measure” page shows how a single wire and photographs allows an extremely experienced saddle fitter to determine which tree will most likely fit your horse. The system of using wires can be easily expanded and adapted to provide horse owners a useful tool in evaluating saddle fit of your current saddle or any saddle you are considering purchasing. Below are instructions for using six wires in a saddle fitting aid or back map.
Materials required:
107” of wire. Best is any piece of wire that can be readily bent but is stiff enough to hold its shape so you can make a tracing of it. We recommend ROMEX or any other fairly heavy gauge electrical wire that can be found at most hardware stores.
Permanent magic marker, fine or medium tipped.
Tape measure or ruler.
Optional, cardboard or card stock for cutting out traces.
Instructions:
Cut 5 pieces of wire, each 16” long, marking the middle. Number the wires 1 to 5 on one side only. The numbers serve to record the order of the wires and to allow you to avoid accidently flipping the wires around.
Cut 1 piece of wire 27“ long. Put five marks completely around the wire 4” apart beginning 4” from one end of the wire. Number, on both sides of the wire, the ticks 1 to 5 which will guide where you put the wires. The length of the wire from the first tick mark to the end of the wire should be 23”, which is the average length of skirting for Crest Ridge saddles.
Align the first tick mark on the long wire at the rear edge of the scapula and mold the wire to conform to the horses back. The front of the wire will go up and over the horses whither. The wire extending back behind the scapula, #1 mark on the wire, should end at or before the horse’s last rib.
Mold the wire labeled 1 (#1 wire) over the horses back at the tick
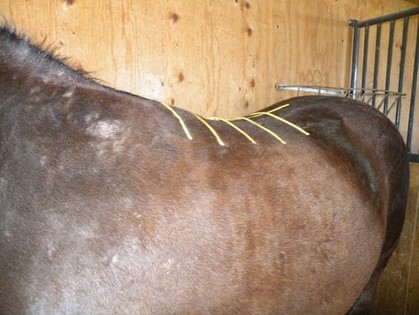 mark on the long wire that is aligned with the back edge of the horse’s scapula (shoulder blade). The #1 wire should be centered over the long wire so that the center tick mark of the #1 wire is directly over the foremost tick mark on the long wire. The wire should be vertical, perpendicular to the ground, with the horse standing square and straight (not looking to the side) on level ground. Make sure the horse is standing with all four feet down and not resting a foot. A properly molded wire maintains contact with the horse’s skin along its entire length. If your horse’s spine is slightly recessed, causing the wire to lose contact with the horses skin for less than an inch on each side of the spine, don’t worry about it. The saddle should not contact the spine anywhere.
Repeat this process for wires #2 through #5 at the corresponding tick marks along the long wire. Again, make certain the horse is standing level and square, with its head forward and all four feet on the ground.
To assess how a saddle fits your horse:
Turn the saddle upside down. We recommend you put the upside down saddle on a blanket to avoid scratching the saddle or getting it dirty.
Lay the long wire along the back channel of the saddle with the #1 tick place even with the conchos at the front of the saddle which gives you a good indication of the front of the tree. On many saddles there is a copper rivet visible which also indicated the front of the tree. What to look for:
The wire should lay along the underside of the saddle evenly if the saddle has the correct rock for the horse. If the saddle skirting extends past the wire, it may be hitting the horse in the loin or interfering with the hips. This is easily checked by placing the saddle on the horse. If the skirting extends past the last rib, it is too long for the horse. If the skirt is past the last rib, but short of the hips, it may be possible to use a pad to protect the horses loin.
If the wire touches the saddle front and back, but not in the middle, the saddle is too flat, not enough rock, for the horse and will likely bridge. Proper use of saddle pads can correct some amount of bridging.
If the wire looses contact on the ends, there is too much rock in the saddle. It is quite possible a saddle with too much rock will sore a horse’s back.
Places wires 1 to 5 at their respective tick marks you made
 on the longer wire used to measure rock. Make sure the fenders and stirrups are out of the way. You may need to gently and evenly press the wire into the fleece under the saddle to make sure the wire is measured against the tree, not the fleece. Be very careful not to distort the shape of the wire when pressing on it.
An excellent alternative is to first place the wire over a piece of cardboard, trace the inside curve of the wire on the cardboard and then cut-out the cardboard along the trace. You now have a cross-section mold of your horses back.
What to look for:
A wire laying nicely along the tree without gapping indicates a good fit.
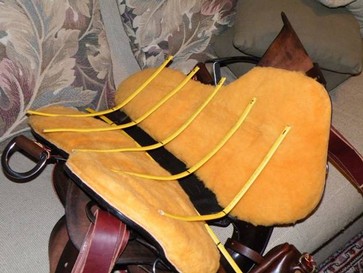
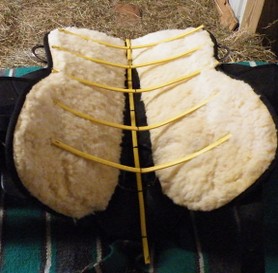
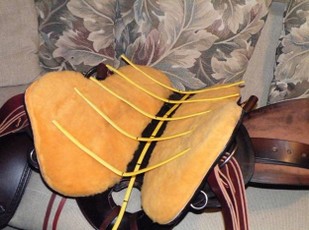
This set of wires was made from a single horse. The saddle on the left fits well. The saddle on the right is too narrow.
If the wire rests on either side of the saddle and does not approach the back channel, the saddle is too narrow for the horse. The saddle will perch along the horse’s ribs near the outside edge of the bars causing pressure points. Pads and shims don’t fix the fit of a too narrow tree.
If the wire pulls away towards the outside of the saddle, the tree is too wide and, if severe enough, may cause the saddle to sit on the horse’s spine. Saddle pads can help a too wide saddle tree fit the horse acceptably, but there are limits to how much correction is possible with saddle pads.
If the center of the wire makes contact with the saddle, the saddle will contact the horse’s spine. A lift pad or a cut-out pad may protect the spine enough for the saddle to be used. The goal is for zero contact along the horse’s spine. The saddle will likely cause pressure points on either side of the horse near its midline since weight is not be distributed over some portion of the bars.
This six wire system offers several advantages for horse owners compared to other saddle fitting systems on the market today. The use of wires allows the horse owner to easily visualize how a saddle will make contact with a horse’s back. If you are using the molds that shape to the horses back, you still can’t see how the bars will contact the horses back. The wires are completely reusable, compared to the molds which are, at best, usable a few times. The wires, or cardboard cut-outs made from tracings of the wires are easily transportable. Best of all, the wires are very inexpensive to make.